🔹 What if you could keep your crypto safe from almost any hacker?
Sounds impossible, right?
Every year, hackers steal billions of dollars in Bitcoin and Ethereum, and phishing scams are on the rise. But there’s a solution that makes your crypto almost untouchable — air-gapped protection.
This guide is for beginners. We’ll explain air-gapped wallets in simple terms. You’ll learn why they’re essential and how to set one up. Ready to lock your crypto away from thieves? Let’s dive in! 🚀
📌 Key Takeaways
- ✅ Ultra-secure storage: Air-gapped devices never connect to the internet, preventing hackers from accessing your crypto.
- ✅ Ideal for HODLing: Perfect for keeping crypto safe long-term.
- ✅ Not for frequent trades: Slower for daily transactions.
- ✅ Potential risks: Physical access to the air-gapped device, human error, or compromised USB devices can still lead to loss or theft of crypto.
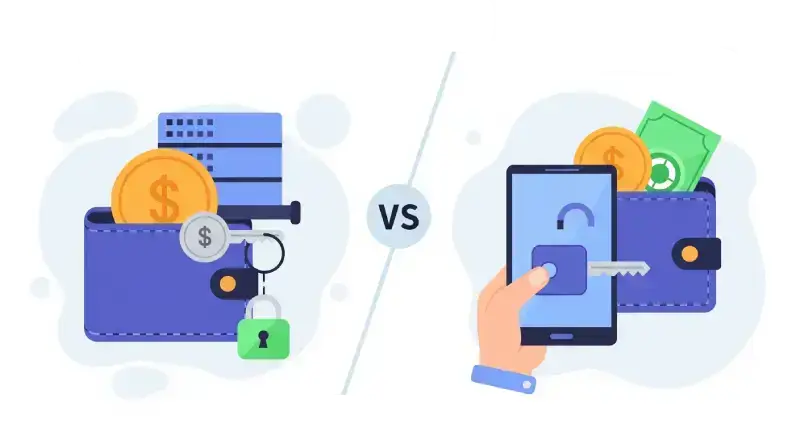
1. What is Air-Gapped Protection?
Air-gapped protection is a method of storing cryptocurrency on a device that is completely offline.
An air-gapped wallet is a type of hardware wallet. However, unlike other hardware wallets, which must be connected to the internet to approve cryptocurrency transfers, air-gapped wallets remain completely isolated from the internet at all times.
The concept of air-gapped protection has its roots in security practices used in government and military environments, where sensitive data is stored in isolated systems to prevent cyberattacks. With the rise of cryptocurrency, this same level of security has been adapted to protect digital assets, offering one of the safest ways to store crypto for long-term holding.
2. Why Use Air-Gapped Protection?
Air-gapped protection is considered one of the most secure ways to store cryptocurrency. The fundamental reason lies in its isolation from the internet, which significantly reduces exposure to cyber threats. Here’s why air-gapped protection is so effective:
- 🦠 Immunity to Malware: Devices used for air-gapped wallets are completely isolated from the internet. This means that even if the device you use to interact with your wallet gets infected by malware, it won’t affect the private keys stored on the air-gapped device. Hackers cannot exploit vulnerabilities through the internet because there’s no online connection.
- 🎣 Phishing Attack Prevention: Phishing attacks, which rely on tricking users into revealing sensitive information through fake websites or apps, become impossible with air-gapped protection. Since the wallet is not connected to the internet, you can’t be phished or targeted by fake crypto sites trying to steal your private keys.
- 🛠️ Enhanced Control: Air-gapped wallets offer you total control over your crypto storage. There’s no reliance on third-party services or centralized infrastructure. You decide how and where to store your backup keys, and you manage the security of your wallet, all on your own terms.
- 💸 Cost-Effective Solution: Unlike specialized hardware wallets, air-gapped protection can be set up using old devices such as laptops or USB drives that you might already have, making it a budget-friendly option for crypto security.
3. Potential Vulnerabilities of Air-Gapped Protection
While air-gapped protection offers exceptional security, it’s not entirely invulnerable. Here are some potential vulnerabilities to keep in mind:
- 🖥️ Physical Access: The biggest risk to air-gapped devices is physical access. If an attacker gains direct access to your air-gapped wallet or the device it’s stored on (such as through theft or tampering), they may be able to compromise it. Without the need for an internet connection, physical possession of the device may allow them to bypass security measures.
- 🤖 Malicious USB or External Devices: Air-gapped wallets rely on transferring data through physical devices like USB drives or QR codes. If any of these external devices are compromised, malware could potentially be transferred onto your air-gapped system. To mitigate this, it’s crucial to ensure all external devices are thoroughly scanned and trusted.
- 🧑💻 Human Error: Even the best systems can be compromised due to user mistakes. A misplaced backup seed phrase, improper storage of the air-gapped device, or transferring data between insecure devices could result in a loss of control over your wallet. Double-checking procedures and securely storing keys are essential to avoid these errors.
- 🔓 Key Exposure During Backup: When setting up or backing up an air-gapped wallet, there’s a risk that your seed phrase or private keys may be exposed to threats, especially if not stored securely. Writing your seed phrase on paper or storing it digitally without encryption increases the chances of it being accessed by an unauthorized party.
- 🌐 Advanced Attacks via Side Channels: Although air-gapped wallets are disconnected from the internet, attackers with advanced capabilities might still attempt to exploit physical side-channel attacks, like power analysis or electromagnetic emissions, to extract sensitive data from the device. These attacks are highly technical but not impossible.
3. How Air-Gapped Protection Works
Air-gapped protection works by ensuring your private keys are never connected to the internet, making it virtually impossible for hackers to access them. The process works in the following steps:
3.1. 🔐 Offline Storage of Private Keys
The first step is to store your private keys on a device that is never connected to the internet. This could be an old laptop or a dedicated hardware wallet.
Why this is secure:
Without an internet connection, there is no way for hackers to target your private keys.
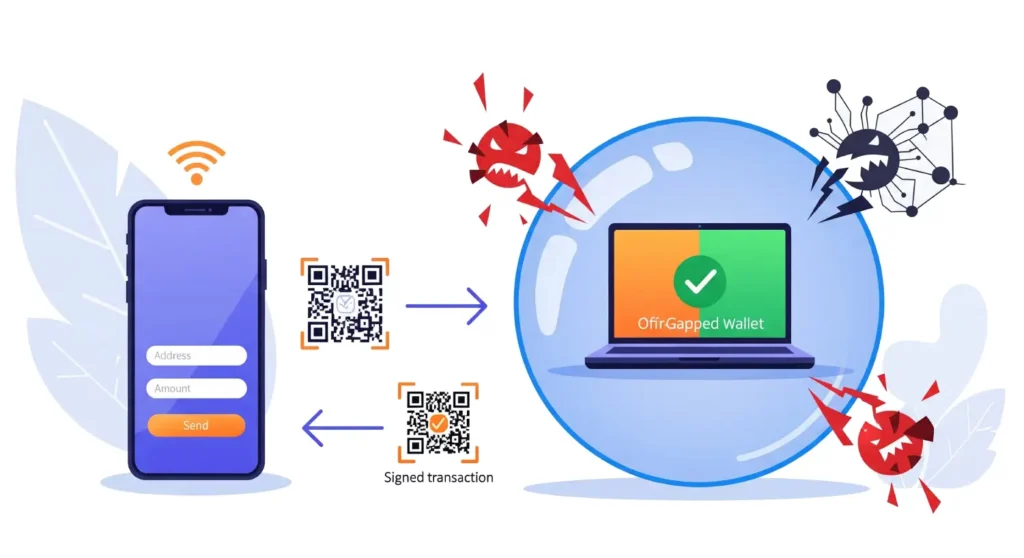
3.2. 💻 Creating the Transaction on an Online Device
When you want to send cryptocurrency, you first create the transaction on an online device (e.g., a computer or smartphone). However, this device does not sign the transaction, ensuring that your private keys remain safe.
What’s important:
The transaction is created, but not signed on the online device to keep the private keys secure.
3.3. 🔄 Transferring the Transaction to the Offline Device
Once the transaction is created, you need to transfer it to the offline device to sign it. This is done via a USB drive or QR code, which moves only the transaction data, without exposing your private keys.
Why this is secure:
At this point, no private keys are transferred, and your sensitive information remains isolated.
📘 Want to dive deeper? 👉 Use a free QR code generator to securely transfer data for your air-gapped wallet: QR Code Generator.
3.4. ✍️ Signing the Transaction on the Offline Device
Now that the transaction is on the offline device, it’s time to sign it. The transaction is approved using the private keys stored securely on the air-gapped device.
Why this is secure:
The signing process happens offline, ensuring that your private keys never leave the device or become exposed to online threats.
3.5. 🔄 Transferring the Signed Transaction Back to the Online Device
Once the transaction is signed, you need to send it back to the online device for broadcasting to the blockchain. This can be done using a USB drive or a QR code.
Why this is secure:
Only the signed transaction data is transferred back. Your private keys and sensitive information remain safe and never leave the offline device.
3.6. 🌐 Broadcasting the Transaction to the Blockchain
Once the signed transaction is back on your online device, it can be broadcast to the blockchain using your preferred crypto platform or wallet.
Air-gapped protection works by completely isolating private keys from the internet. As long as you control physical access to the offline device, your crypto assets remain secure.
4. Guide to Setting Up Air-Gapped Protection
Setting up an air-gapped wallet might seem like a complicated process, but it’s actually straightforward if you follow the steps carefully. This guide will walk you through the entire setup, from choosing your device to securely signing transactions.
Step 1: Choose Your Device
The first step is to select the device that will be used for your air-gapped wallet. You can repurpose an old laptop, USB drive, or even a dedicated hardware wallet. Here are some options:
- 💻 Old Laptop or Desktop: You can use an old laptop or desktop that doesn’t have any connection to the internet. It’s ideal because it gives you the flexibility to install custom software for your wallet.
- 🖱️ USB Drive: If you don’t have an extra laptop lying around, a USB drive can also be used as the air-gapped device. You’ll store your wallet files on this USB stick and never connect it to the internet.
- 🔑 Hardware Wallet: If you prefer to use a dedicated solution, hardware wallets can also serve as an air-gapped device if they are not connected to the internet.
Step 2: Prepare the Device
Now that you have your device, it’s time to prepare it for use. This step is crucial to ensure that your device stays secure during the entire process.
- 🚫 Disable All Network Connections: Ensure that the device has no access to the internet. Turn off Wi-Fi, Bluetooth, and Ethernet. This ensures that the device stays air-gapped and fully isolated.
- 🐧 Install a Clean Operating System: If you’re using a laptop or desktop, install a clean operating system (OS). You can use something like Ubuntu or another lightweight, secure OS that doesn’t have unnecessary software that could be exploited. A bootable USB drive with Ubuntu is a great choice for a fresh installation.
- 🔒 Use Trusted Software: Once the OS is installed, you need to download trusted cryptocurrency wallet software. Good options include Electrum and Sparrow, which are open-source and designed for security. Be sure to download the software from their official websites, and never connect the air-gapped device to the internet while doing this.
Step 3: Create a Wallet
Once your device is prepared, it’s time to create a new wallet. This step involves generating a seed phrase (a backup key) that will allow you to recover your wallet if something goes wrong.
- 🔑 Generate a Seed Phrase: When you first set up your wallet, you will be asked to generate a seed phrase (usually 12 or 24 words). This seed phrase is your backup key to restore your wallet, so it’s crucial to write it down and store it safely.
- 📝 Secure Your Seed Phrase: Once you’ve generated your seed phrase, write it down on paper. Some people also engrave it on a metal plate for better durability. Do not store it digitally (not even in cloud storage) to avoid it being hacked.
- 📦 Store Your Seed Phrase: Store your seed phrase in a secure location—a locked safe or another physical, secure place. You can also create multiple copies of the seed phrase and store them in different locations for added security.
Step 4: Sign Transactions Offline
The key feature of an air-gapped wallet is that it allows you to sign transactions offline, keeping your private keys away from any online threats.
- 🖥️ Create the Transaction on an Online Device: When you want to send crypto, first create the transaction on your online device (like a laptop or phone). Make sure the transaction is correct, including the recipient’s address and amount.
- 📲 Transfer the Transaction Data to the Air-Gapped Device: You can transfer the transaction data using either a QR code or a USB drive. If you’re using a QR code, generate it on your online device and scan it with the air-gapped device. If you’re using a USB drive, transfer the transaction file to the USB, then plug it into the air-gapped device.
- ✍️ Sign the Transaction on the Air-Gapped Device: On the offline device, approve and sign the transaction. The private keys stored on the air-gapped device will be used to sign the transaction, but they will never leave the device or be exposed to the internet.
Step 5: Broadcast the Signed Transaction
Once your transaction is signed, it’s time to send it to the blockchain. This step is done by transferring the signed transaction data back to your online device.
- 🖥️ Transfer the Signed Transaction: Use the same method as before (USB drive or QR code) to move the signed transaction from the air-gapped device back to your online device.
- 🌐 Broadcast the Transaction: Once the signed transaction is on your online device, you can broadcast it to the blockchain by submitting it through your preferred crypto platform or wallet.
Step 6: Store the Device Securely
After each use, it’s important to store the air-gapped device securely to prevent unauthorized access.
- 🔒 Store the Air-Gapped Device Safely: Keep the air-gapped device in a secure location, like a locked safe. It’s also a good idea to periodically check that the device is working properly and has not been tampered with.
- 🛡️ Check Your Setup Periodically: Every few months, verify that the air-gapped wallet is still functioning correctly. This includes checking that you can access the wallet and that your private keys are intact.
5. Comparison Table: Air-Gapped vs Other Methods
How does air-gapped protection compare to other crypto storage options? This table breaks it down.
| Method | Security | Setup Difficulty | Transaction Ease | Cost | Ideal For |
|---|---|---|---|---|---|
| Air-Gapped Wallet | ✅ High | 📊 Medium | ⚠️ Low | 💸 Low/Free | 🏠 Long-Term Storage |
| Hardware Wallet | 📊 Medium | ✅ Easy | 📊 Medium | 💰 High | 💼 Medium-Term Storage |
| Hot Wallet | ⚠️ Low | ✅ Easy | ✅ High | ✅ Free | ⚡ Frequent Trading |
Key Differences:
- Air-Gapped Wallet: High security, as it is offline and immune to remote attacks. However, transactions are slower and it requires a bit more effort to set up and manage.
- Hardware Wallet: Provides a good level of security but still relies on being connected to a computer. Easy to use and set up, but costs can range from $50 to $150.
- Hot Wallet: The most convenient and fast for frequent transactions, but also the least secure. They are connected to the internet and vulnerable to hacking, making them unsuitable for storing large amounts of crypto long-term.
Pick the wallet that suits your goals.
6. Frequently Asked Questions
Got questions about air-gapped protection? Here are answers to common beginner queries.
Q1: 📱 Can I use an old smartphone as an air-gapped device?
A: Yes, but make sure to disable all network connections (Wi-Fi, Bluetooth, and mobile data). It’s best to treat it just like an offline laptop for safety.
Q2: 🔍 How often should I check my air-gapped device?
A: Check every 3–6 months to ensure it’s functioning and accessible.
Q3: 🗄️ What happens if I lose my air-gapped wallet?
A: You can recover your funds using the seed phrase if it’s stored securely.
Q4: 📲 Are QR codes safe for transferring data?
A: Yes, as long as you use a secure scanner and avoid online devices.
Q5: 🛡️ Can air-gapped wallets be hacked?
A: They’re highly secure, but physical access to the device or seed phrase could compromise security.
🧭 Conclusion
Air-gapped protection offers one of the most secure ways to store your cryptocurrency by keeping it completely offline and immune to online threats. It’s ideal for HODLers and anyone looking to store large amounts of crypto for the long term.
While setting it up may take a bit more effort, the security it provides is unmatched. By following the steps outlined in this guide, you can create a safe and reliable method for securing your digital assets.
Ready to protect your crypto? Start with a small amount and practice before storing larger sums. Your crypto deserves strong protection, and air-gapped wallets provide a critical layer of defense.
📘 Want to dive deeper? 👉 Explore our guide: What is the Best Crypto Security?